One of the biggest concerns regarding the iPad was that it couldn’t play Flash, which would have resulted in a poor web browsing experience and in playing only dull games. Anyway, Apple fans got used to not having Flash on their devices, so everything seemed to be in order, if we were to look at the millions iPads sold in a couple of months or at the million iPhone 4 phones sold in the launch day.
However, creativity never sleeps: if you’re willing to jailbreak your iPad, you can enjoy Flash applications, even if there are voices claiming Flash is already outdated and developers should be encouraged to code in HTML5.
This is a demo video which shows how Spirit jailbreak managed to port the mobile Flash Android plugin to Apple’s iOS and how Frash enables Flash content to play on the iPad.
It’s all good, but I have a question for iPad owners: would you jailbreak your device or not?
Read More...


- Find out what I'm doing, Follow Me :)
How To Enable Flash On The iPad

The Best iPad Accessory of 2010: ZAGGmate

ZAGGmate is an iPad case and at the same time a stand and a bluetooth keyboard. Well, there are two versions of the ZAGGmate: with or without a keyboard. The price difference between the two is only $30, so if you always wanted an external keyboard for your iPad but didn’t feel like giving up on portability, this is the best accessory your money can buy. It’s true I’ve read a couple reviews of people complaining about the rough edges of ZAGGmate or about the fact that you need to use a pin or a toothpick to press the bluetooth button on the keyboard. Nonetheless, even those people ended up by saying ZAGGmate is awesome, it’s a must-have accessory for those of you who enjoy typing faster.
If you want to secure your ZAGGmate, you can follow my previous link to the ZAGGmate review to see how you can preorder one. It could be a great gift, don’t you think so? Read More...
5 Ways to Save Money Before and After Bankruptcy

Steps to save money before and after filing bankruptcy?
1. Deposit money in the savings account:
You need to create a budget for your personal finances as soon as you enroll with a law firm. Keep aside a specific amount of money that you have planned to deposit in your savings account. With the arrival of the pay check put aside a fixed amount for your savings account. Therefore you won’t get tempted to spend the money for other purpose. One you have deposited the amount make sure that you do not take it out.
2. Avoid extravagance:
The best thing you can do is to avoid being extravagant therefore purchase things that are bare essential. If you can’t afford branded clothes right now then keep your plans on hold instead look for non branded attires that might be at affordable rate as well as trendy. Evaluate your budget plan and check where your money is draining. Locate the items that are primary targets on the list while you review your budget.
3. Choose cash over credit card:
The bankruptcy attorney’s would ask you to increase the use of cash rather than plastic money. They might even suggest you to instruct the credit card company to close the accounts. After filing for bankruptcy avoid applying for new card or plan to re-open the account. Use your credit card only if you come across emergency. The vicious cycle of minimum payment might entrap you into debt again.
4. Get things in whole sale rate:
When you purchase items on whole sale rate they would help to save a good amount of cash than buying an item. When you plan to buy stuffs in bulk ensure that you stick to the basic items. The offers at shopping malls might be pocket friendly.
5. Do things yourself:
Things like mowing the land, walking the dog, can be easily done by you therefore avoid appointing anyone for these works. Ask one of your family members to help you, in this way you can save a hefty amount. Be smart by investing your time than money.
Read More...
Custom accordion slider for your iWeb all in CSS3
Continuing in the vain of adding CSS3 bits n’ pieces to iWeb in an effort to bring it up to date I have been working on something that uses the new ‘transition’ elements taken from the new version.
This week I would like to show you how to insert a custom accordion style slider into your iWeb sites. These are becoming particularly popular at the moment as they are something that you can place on your homepage, without taking up too much space, but it still allows you to give a bit of information about your other pages.
The full code is attached at the bottom of this post and, as with all of the other CSS3 posts I have produced so far it is fully customizable. I picked the gray gradient because I thought it looked ‘Appley’ but you can use anything you want. You don’t even have to use a gradient if you don’t want to.
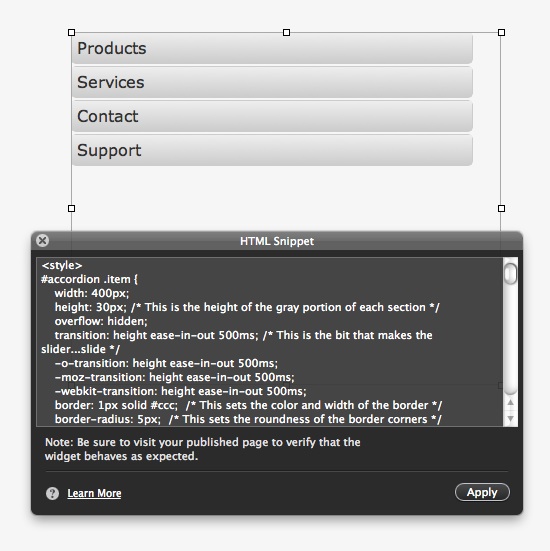
Of course the font can be changed to fit your site too as can the number of different elements. You can see from the image below that I have chosen 4, but with a bit of copy/pasting within the code you can have as many as you like.
And as you can also see from the image above, you can do all this with a HTML Snippet; I told you you can do pretty much anything.
So what does this accordion slider do?
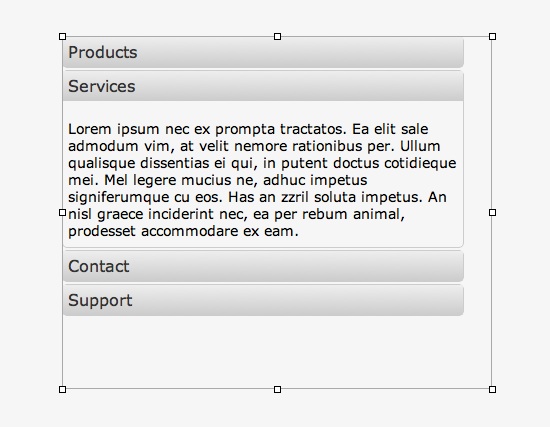
As you slide your mouse cursor over each gray element a box slides down from underneath it giving your visitor a bit more information about the subject heading. Take a look at the screenshots below to see what I mean.
All you have to do is download the code from the link below, paste it into a HTML Snippet within iWeb and click ‘Apply’. You will have to make sure that you drag the bottom-middle handle down so that the scroll action will fit, it is trial and error, but it does work.
I have commented up the css explaining a little bit about which bit does what and helping you to change elements. You may even want to refer to my previous post about on-line CSS3 tools to help you pick new gradients or borders to suit your site (or even match your CSS3 buttons….)
Download the css3slider file
Have you used this or other CSS3 elements in your iWeb site? Leave a comment and let us take a look.
Read More...

How to add a Facebook Like button to your iWeb site
I have been meaning to do this tutorial for quite a while now but never got round to it. I am sure once you find out how easy it is to do you will be amazed that you didn’t try it sooner.
Unless you have been living in a cave somewhere in the middle of nowhere for the last 8 years you will know that Facebook is the second most popular web-site on the face of the planet after Google. With that sort of pulling power it seems almost ridiculous not to include a Facebook ‘Like’ button on your web-site.
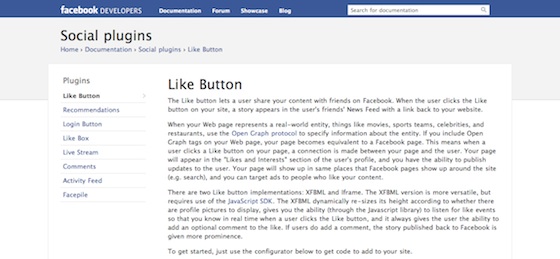
So how do we go about adding a button to our iWeb sites? Simple! To begin with you will need to point your browser in the direction of the Facebook Developers page regarding Social Plugins.
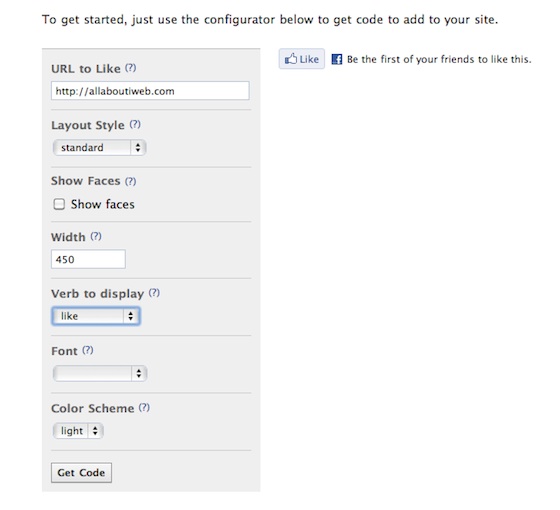
Once there, scroll down a bit and you will see a long gray rectangle containing various elements that you will have to complete and an example of how your button will look.
Fill in the relevant boxes, starting with the page URL you want to add the button to. You can of course just add your site’s URL and only get the code once, else you will have to get the code for every page you add the button to.
Next choice to make is which layout you want for your button. There are three to choose from, Standard, Button Count or Box Count; pick one that suits your site.
You now have the option to show faces (of the people who click your button) along with the width of the button.
Next up you get to choose whether you want ‘Like’ or ‘Recommend’ on your button, followed by the font and finally a light or dark color scheme.
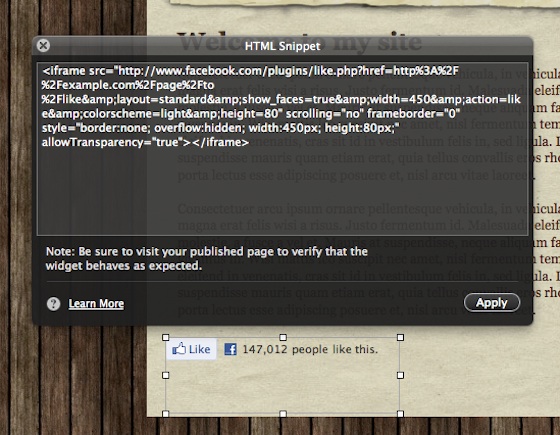
Once you have decided, click the ‘Get Code’ button and after a short while a pop-up window should appear with two types of code in it.
You want the top bit – or the ‘iframe’ portion – of the the code so select it all and then hit Cmd+C to copy it.
Now it’s time to open iWeb and navigate to the page and area where you would like your button to appear.
Drag in a HTML Snippet and paste in the code you just copied; click ‘Apply’ and your button should appear. It won’t work just yet though as you have not published the page.
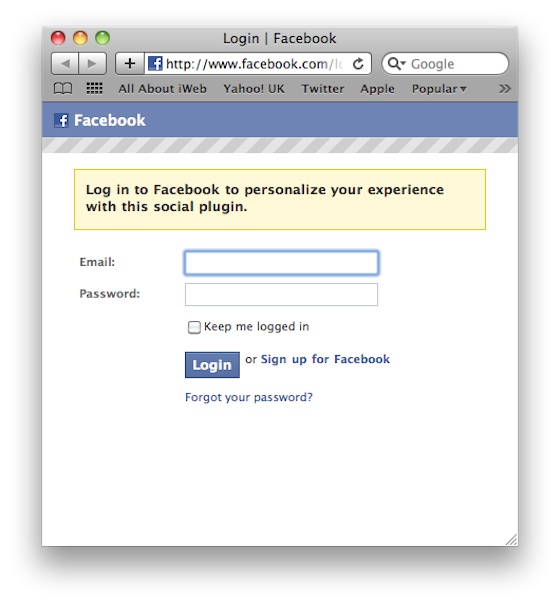
To test your button works publish your site to a folder, view the site and the navigate to the page with the button. When you click on it your will be presented with a pop-up window containing the Facebook login box.
And that is all you have to it. I told you it was easy. If you want to add a new button to your iWeb site, for example each time you publish a blog entry, then make sure you add the Facebook page to your bookmarks.
So have you added the Facebook button to your page? or will you do so now? Leave us a comment with your URL and let us know.
Read More...